

As React applications grow, managing and sharing state between components becomes increasingly challenging.
Imagine building an e-commerce application where multiple components need access to the same shopping cart data:
The Header displays the cart item count.
The Product List allows users to add products.
The Cart Page displays selected products.
The Checkout Page calculates the total amount.
Initially, you might pass cart data through props from one component to another. This works for small applications, but as the component tree grows, it becomes difficult to maintain.
This problem is known as Prop Drilling.
React provides a built-in solution called the Context API, which allows components to share data without manually passing props through every intermediate component.
In this article, we’ll understand how Context API works, implement it using a real-world shopping cart example, explore performance optimization techniques, and understand when to choose alternatives.
🧩 What Is React Context API?
React Context API is a built-in React feature that allows you to share data across multiple components without explicitly passing props through every level of the component tree.
It provides a way to make certain data available to any component within a particular provider’s subtree.
For example, consider an application where several components need access to the authenticated user’s information.
Instead of passing the user object through multiple components, you can create a User Context and allow any component inside its provider to access that information.
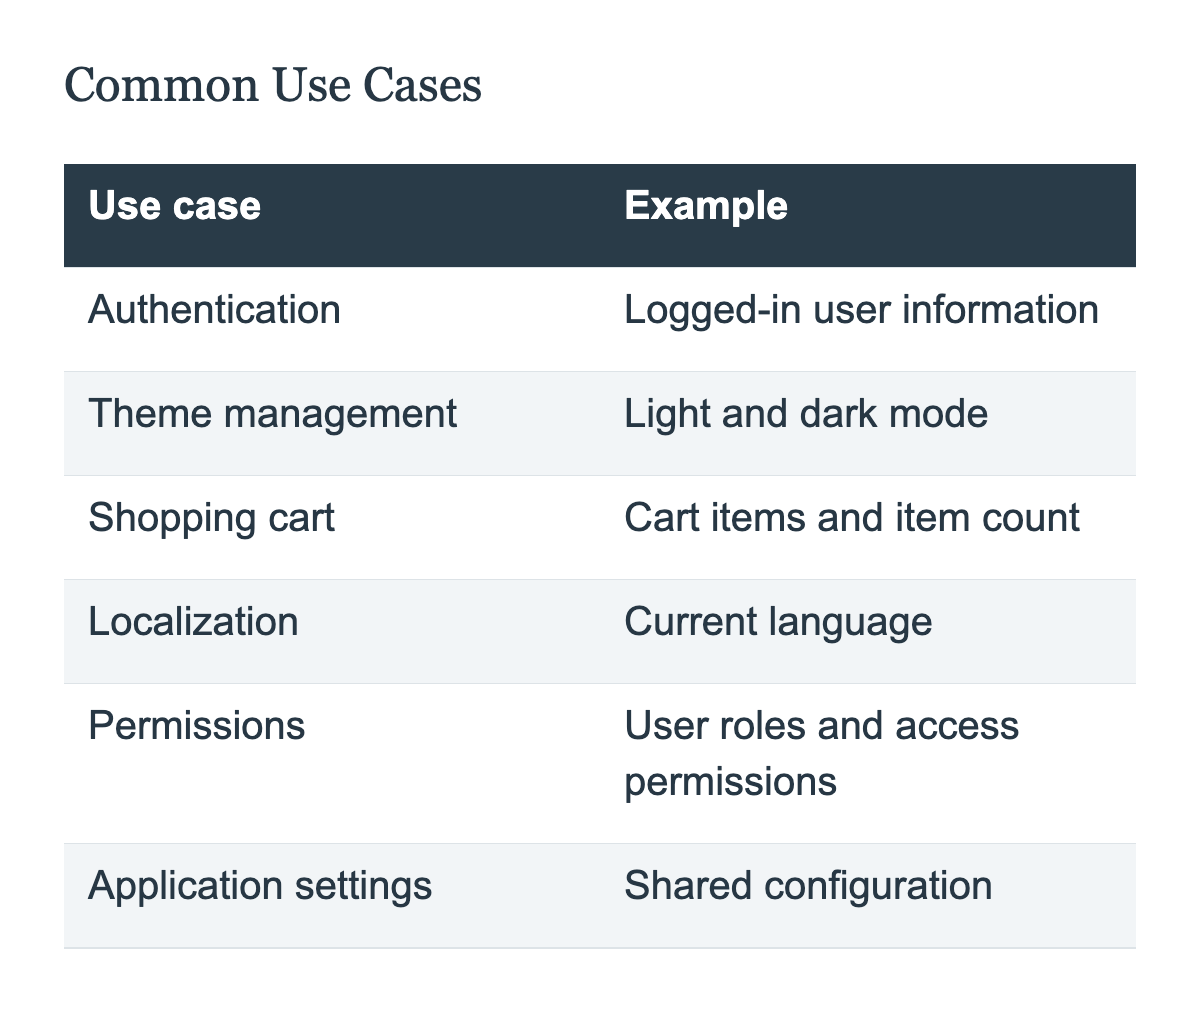
Common examples include:
Authentication information
Theme preferences (Light/Dark mode)
Shopping cart data
Language and localization settings
Application-wide configuration
🧐 Understanding Prop Drilling
Before understanding Context API, let’s look at the problem it solves.
Suppose we have the following component structure:
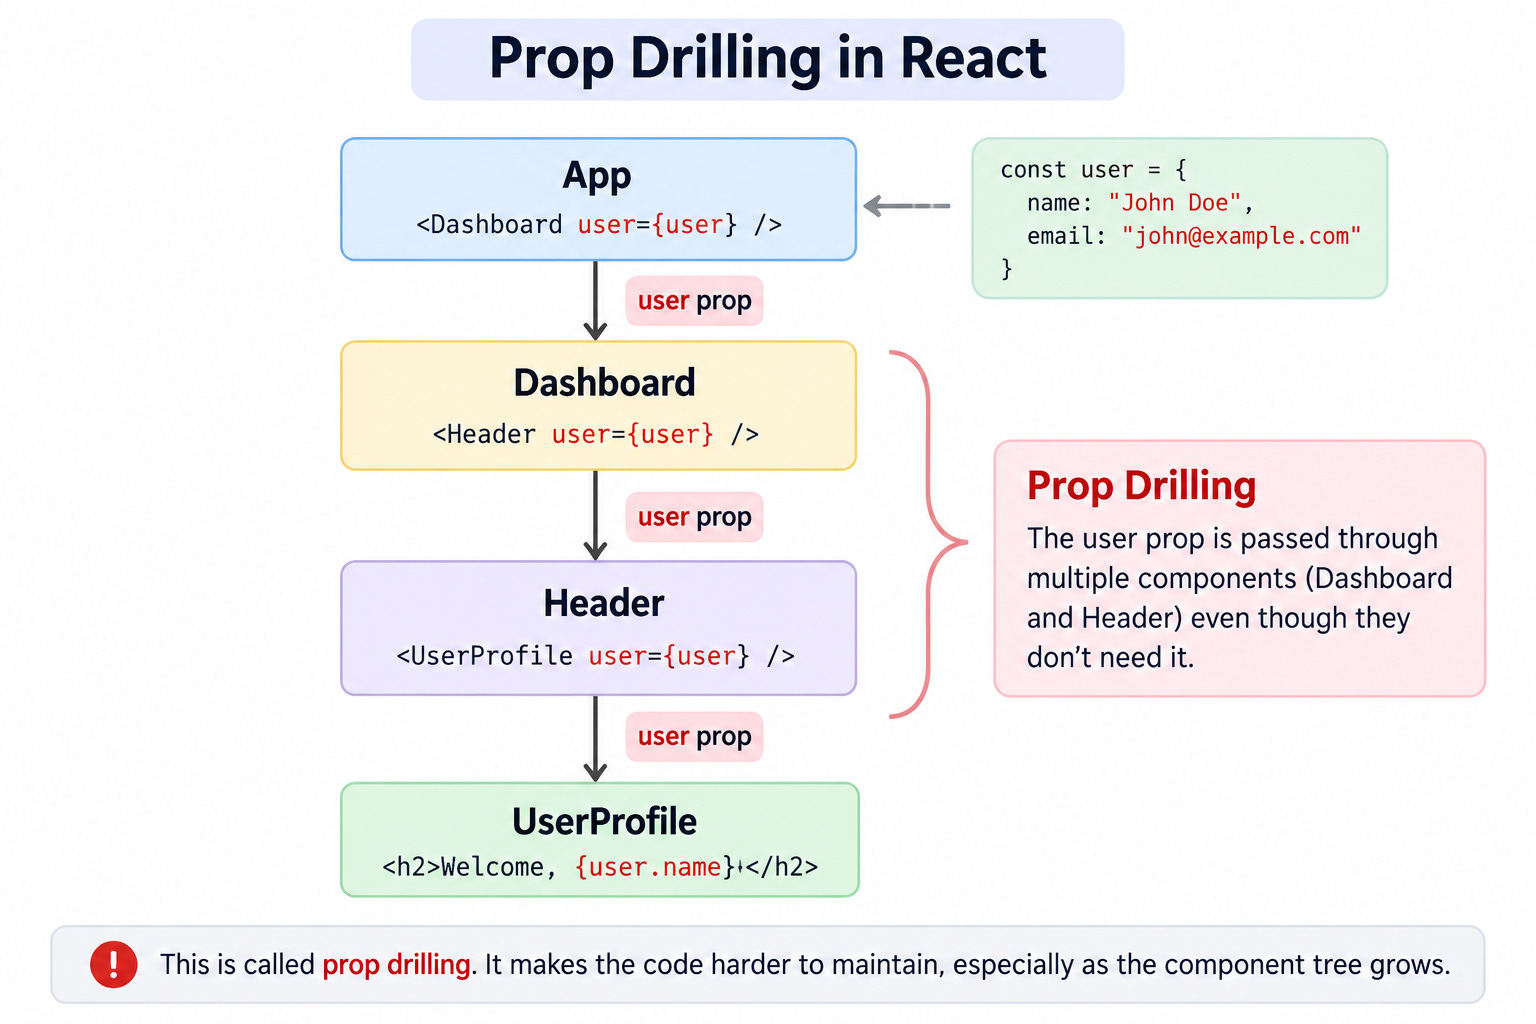
The App component owns the user information, but only UserProfile needs it.
Without Context API, we must pass the user object through every intermediate component.
Example: Without Context API
function App() {
    const user = {
        name: "John Doe",
        email: "john@example.com"
    };

    return <Dashboard user={user} />;
}

function Dashboard({ user }) {
    return <Header user={user} />;
}

function Header({ user }) {
    return <UserProfile user={user} />;
}

function UserProfile({ user }) {
    return <h2>Welcome, {user.name}</h2>;
}
Notice that Dashboard and Header don’t actually need the user information.
They simply receive it to pass it to another component.
This is called Prop Drilling.
✅ How Context API Solves This Problem
With Context API, we can share the user information directly with components that need it.
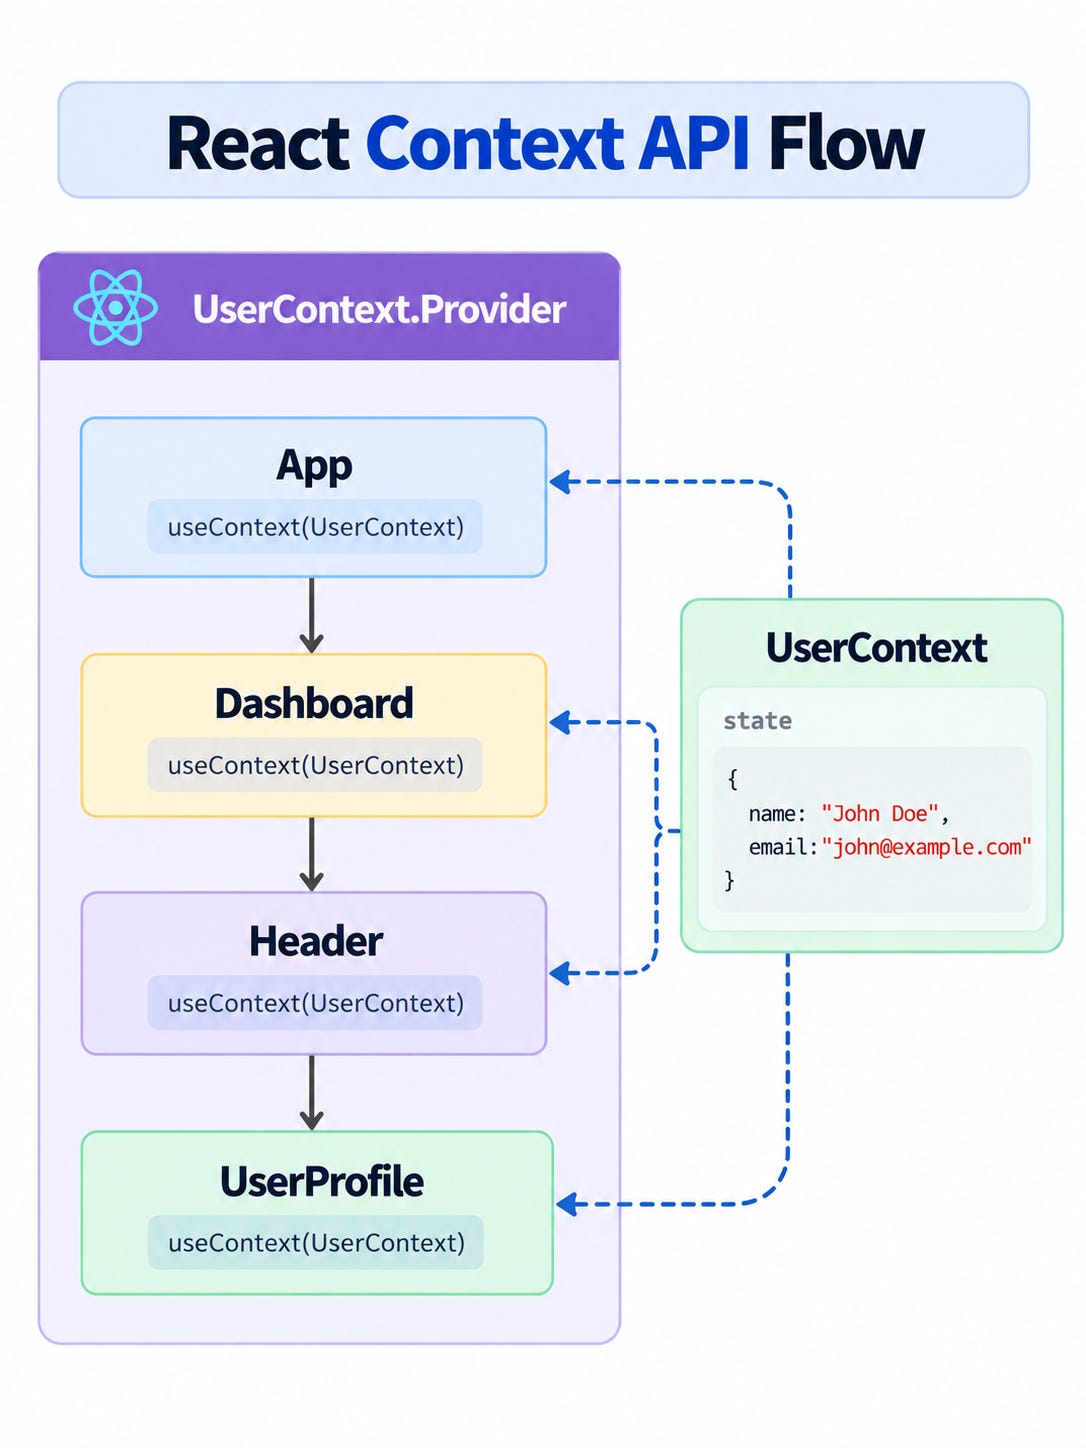
Now, UserProfile can access the user information directly without receiving it through intermediate components.
That’s the primary purpose of React Context API.
🤔 Why Should We Use Context API?
Context API becomes useful when multiple components need access to the same data.
Without a shared state mechanism, developers often introduce unnecessary prop passing and duplicate state.
Context API helps solve these problems.
Key Benefits
1. Eliminates Prop Drilling
Components can access shared data directly without passing props through multiple intermediate components.
2. Centralized State Sharing
Related shared state can be managed in one place instead of maintaining separate copies across components.
3. Cleaner Component Architecture
Components become less dependent on their parent components.
4. Built into React
You don’t need an external library to implement Context API.
5. Reusable Logic
You can combine Context API with custom hooks to create reusable state management logic.
However, Context API is not intended to replace every state management solution. We’ll discuss its limitations later.
🎯 Understanding the Three Main Concepts
Before implementing Context API, let’s understand its three important building blocks.
📌 createContext()
createContext() creates a Context object that can be used to share data between components.
import { createContext } from "react";

export const CartContext = createContext(null);
Here, we created a context named CartContext.
The initial value is null, which acts as the default value when a component does not have a matching provider above it.
📌 Provider Pattern
A Context Provider makes a value available to all components inside its subtree.
<CartContext.Provider value={cartData}>
    <App />
</CartContext.Provider>
Any component inside this provider can access cartData using useContext().
📌 useContext()
useContext() allows a component to consume data from the nearest matching Context Provider.
import { useContext } from "react";
import { CartContext } from "./CartContext";

function Cart() {
    const cart = useContext(CartContext);

    return <div>{cart.totalItems}</div>;
}
These three concepts form the foundation of Context API.
🛠️ Real-World Implementation: Shopping Cart
Let’s implement a simple shopping cart for an e-commerce application.
Our application will support the following functionality:
Display available products.
Add products to the shopping cart.
Increase and decrease product quantities.
Remove products from the cart.
Display the total number of items.
Calculate the total cart amount.
Share cart information between different components.
Instead of passing cart information through props, we’ll use Context API.
🗂️ Project Structure
Let’s organize our application using a clean folder structure.
src/
│
├── context/
│   └── CartContext.jsx
│
├── hooks/
│   └── useCart.js
│
├── components/
│   ├── Header.jsx
│   ├── ProductList.jsx
│   └── Cart.jsx
│
├── App.jsx
└── main.jsx
This structure separates context management, reusable hooks, and UI components.
👉 Create Cart Context
Create a file named CartContext.jsx inside the context directory.
import { createContext, useMemo, useState } from "react";

export const CartContext = createContext(null);

export function CartProvider({ children }) {

    const [cartItems, setCartItems] = useState([]);

    const addToCart = (product) => {
        setCartItems((previousItems) => {
            const existingItem = previousItems.find(
                (item) => item.id === product.id
            );

            if (existingItem) {
                return previousItems.map((item) =>
                    item.id === product.id
                        ? { ...item, quantity: item.quantity + 1 }
                        : item
                );
            }

            return [
                ...previousItems,
                { ...product, quantity: 1 }
            ];
        });
    };

    const removeFromCart = (productId) => {
        setCartItems((previousItems) =>
            previousItems.filter((item) => item.id !== productId)
        );
    };

    const updateQuantity = (productId, quantity) => {
        if (quantity < 1) return;

        setCartItems((previousItems) =>
            previousItems.map((item) =>
                item.id === productId
                    ? { ...item, quantity }
                    : item
            )
        );
    };

    const totalItems = cartItems.reduce(
        (total, item) => total + item.quantity,
        0
    );

    const totalAmount = cartItems.reduce(
        (total, item) => total + item.price * item.quantity,
        0
    );

    const value = useMemo(() => ({
        cartItems,
        totalItems,
        totalAmount,
        addToCart,
        removeFromCart,
        updateQuantity
    }), [cartItems, totalItems, totalAmount]);

    return (
        <CartContext.Provider value={value}>
            {children}
        </CartContext.Provider>
    );
}
What’s happening here?
createContext()creates our cart context.CartProvidermanages the shopping cart state.useState()stores cart items.addToCart()adds a new product or increases its quantity.removeFromCart()removes a product.updateQuantity()updates the selected quantity.totalItemscalculates the total quantity of products.totalAmountcalculates the total cart price.useMemo()memoizes the context value to avoid creating a new value object on every provider render when its dependencies haven’t changed.
We now have a centralized place to manage shopping cart functionality.
👉 Create a Custom Hook
Although we can use useContext(CartContext) directly inside every component, repeatedly writing this code is unnecessary.
Instead, let’s create a custom hook called useCart().
Create useCart.js inside the hooks directory.
import { useContext } from "react";
import { CartContext } from "../context/CartContext";

export function useCart() {
    const context = useContext(CartContext);

    if (!context) {
        throw new Error(
            "useCart must be used within CartProvider"
        );
    }
    return context;
}
Why create a custom hook?
Avoids repeating
useContext()throughout the application.Provides a single access point for cart functionality.
Makes the code cleaner and easier to maintain.
Helps identify incorrect provider usage early.
Now, instead of importing CartContext everywhere, components can simply call useCart().
👉 Create the Header Component
Our Header component needs to display the total number of items in the shopping cart.
import { useCart } from "../hooks/useCart";

function Header() {

    const { totalItems } = useCart();

    return (
        <header>
            <h2>My E-Commerce Store</h2>
            <div>
                Cart ({totalItems})
            </div>
        </header>
    );
}

export default Header;
Notice something important.
The Header component does not receive cart information through props.
It accesses the shared cart state directly using useCart().
👉 Create the Product List Component
Now let’s display products and allow users to add them to their shopping cart.
import { useCart } from "../hooks/useCart";

const products = [
    {
        id: 1,
        name: "Laptop",
        price: 50000
    },
    {
        id: 2,
        name: "Headphones",
        price: 2000
    },
    {
        id: 3,
        name: "Keyboard",
        price: 1500
    }
];

function ProductList() {

    const { addToCart } = useCart();

    return (
        <div>
            <h2>Available Products</h2>

            {products.map((product) => (
                <div key={product.id}>
                    <h3>{product.name}</h3>
                    <p>₹{product.price}</p>
                    <button
                        onClick={() => addToCart(product)}
                    >
                        Add to Cart
                    </button>
                </div>
            ))}
        </div>
    );
}

export default ProductList;
The ProductList component can now update the shared cart state without knowing how the cart is implemented internally.
👉 Create the Cart Component
Let’s create another component to display selected products and calculate the total amount.
import { useCart } from "../hooks/useCart";

function Cart() {

    const {
        cartItems,
        totalAmount,
        updateQuantity,
        removeFromCart
    } = useCart();

    return (
        <div>
            <h2>Shopping Cart</h2>

            {cartItems.length === 0 && (
                <p>Your cart is empty.</p>
            )}

            {cartItems.map((item) => (
                <div key={item.id}>
                    <h3>{item.name}</h3>

                    <p>Price: ₹{item.price}</p>

                    <p>Quantity: {item.quantity}</p>

                    <button
                        onClick={() =>
                            updateQuantity(
                                item.id,
                                item.quantity + 1
                            )
                        }
                    >
                        +
                    </button>

                    <button
                        onClick={() =>
                            updateQuantity(
                                item.id,
                                item.quantity - 1
                            )
                        }
                    >
                        -
                    </button>

                    <button
                        onClick={() => removeFromCart(item.id)}
                    >
                        Remove
                    </button>
                </div>
            ))}

            <h3>Total Amount: ₹{totalAmount}</h3>
        </div>
    );
}

export default Cart;
Now the Cart component can access the same cart data that the ProductList and Header components use.
👉 Wrap the Application with CartProvider
The final step is to make our context available throughout the application.
Update main.jsx.
import React from "react";
import ReactDOM from "react-dom/client";

import App from "./App";
import { CartProvider } from "./context/CartContext";

ReactDOM.createRoot(
    document.getElementById("root")
).render(
    <React.StrictMode>
        <CartProvider>
            <App />
        </CartProvider>
    </React.StrictMode>
);
Update App.jsx.
import Header from "./components/Header";
import ProductList from "./components/ProductList";
import Cart from "./components/Cart";

function App() {
    return (
        <>
           <Header />
            <ProductList />
            <Cart />
        </>
    );
}
export default App;
That’s it!
We have successfully implemented a shared shopping cart using React Context API.
All three components can access and update the same cart state without prop drilling.
The important thing to understand is that the provider owns the shared state.
When a component updates the cart, React updates the provider’s state and notifies components that consume that context.
✨ Context API Best Practices
When using Context API in production applications, follow these practices.
1. Keep Context Focused
Avoid putting every application state into one large context.
Create separate contexts based on responsibilities.
2. Use Custom Hooks
Instead of directly calling useContext() throughout your application, provide custom hooks such as useAuth(), useCart(), and useTheme().
3. Keep Business Logic Outside UI Components
Put shared state management and business logic inside providers or dedicated service modules rather than making components responsible for everything.
4. Avoid Unnecessary State Duplication
Don’t maintain multiple copies of the same shared state in different components.
5. Memoize When Necessary
Use useMemo and useCallback when they provide measurable benefits or prevent unnecessary context value changes.
6. Handle Missing Providers
Throw a meaningful error from custom hooks when a required provider is missing.
7. Don’t Use Context for Everything
Local component state should remain local when it doesn’t need to be shared.
For example, a dropdown’s open/closed state usually belongs inside the dropdown component.
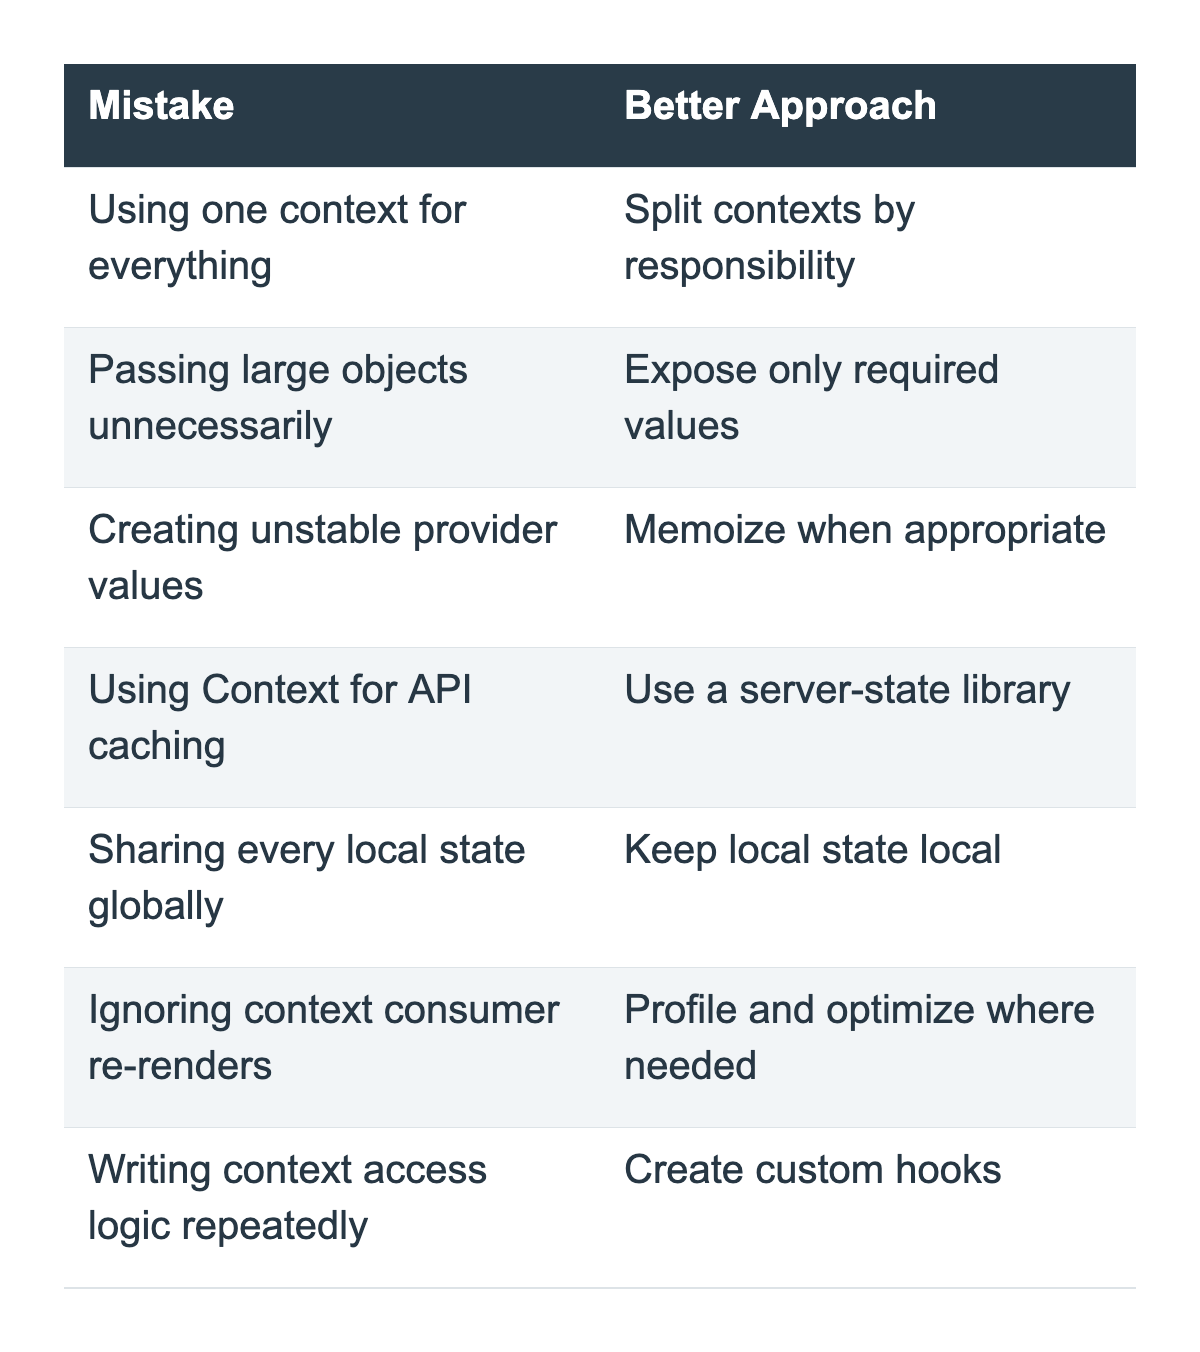
❌ Common Mistakes to Avoid
Here are some mistakes developers should avoid when working with Context API.
🏁 Conclusion
React Context API is a simple and powerful built-in mechanism for sharing data across components without passing props through every intermediate level.
It helps solve prop drilling, improves component organization, and makes shared state easier to manage.
However, Context API should not be treated as a universal state management solution.
For simple shared state such as themes, authentication information, and application settings, Context API is often more than enough.