

Managing state is one of the most important parts of building React applications. As an application grows, sharing and managing state across multiple components can become challenging.
React provides useState and Context API for managing state, but as applications become more complex, managing shared state can require a more structured approach.
This is where Redux comes in.
Let’s understand what Redux is, how it works, and how to implement it in React using Redux Toolkit.
👉 What is Redux?
Redux is a predictable state management library that helps manage application state in a centralized store.
Instead of passing data between multiple components through props, components can access the shared state directly from the Redux store.
Why do we need Redux?
Consider an e-commerce application where multiple components need access to the same data:
Header displays the cart item count.
Product component adds products to the cart.
Cart component displays selected products.
Checkout component uses cart information.
Without centralized state management, sharing and synchronizing this data can become difficult.
Redux solves this problem by maintaining a centralized application state.
👉 How Redux Works
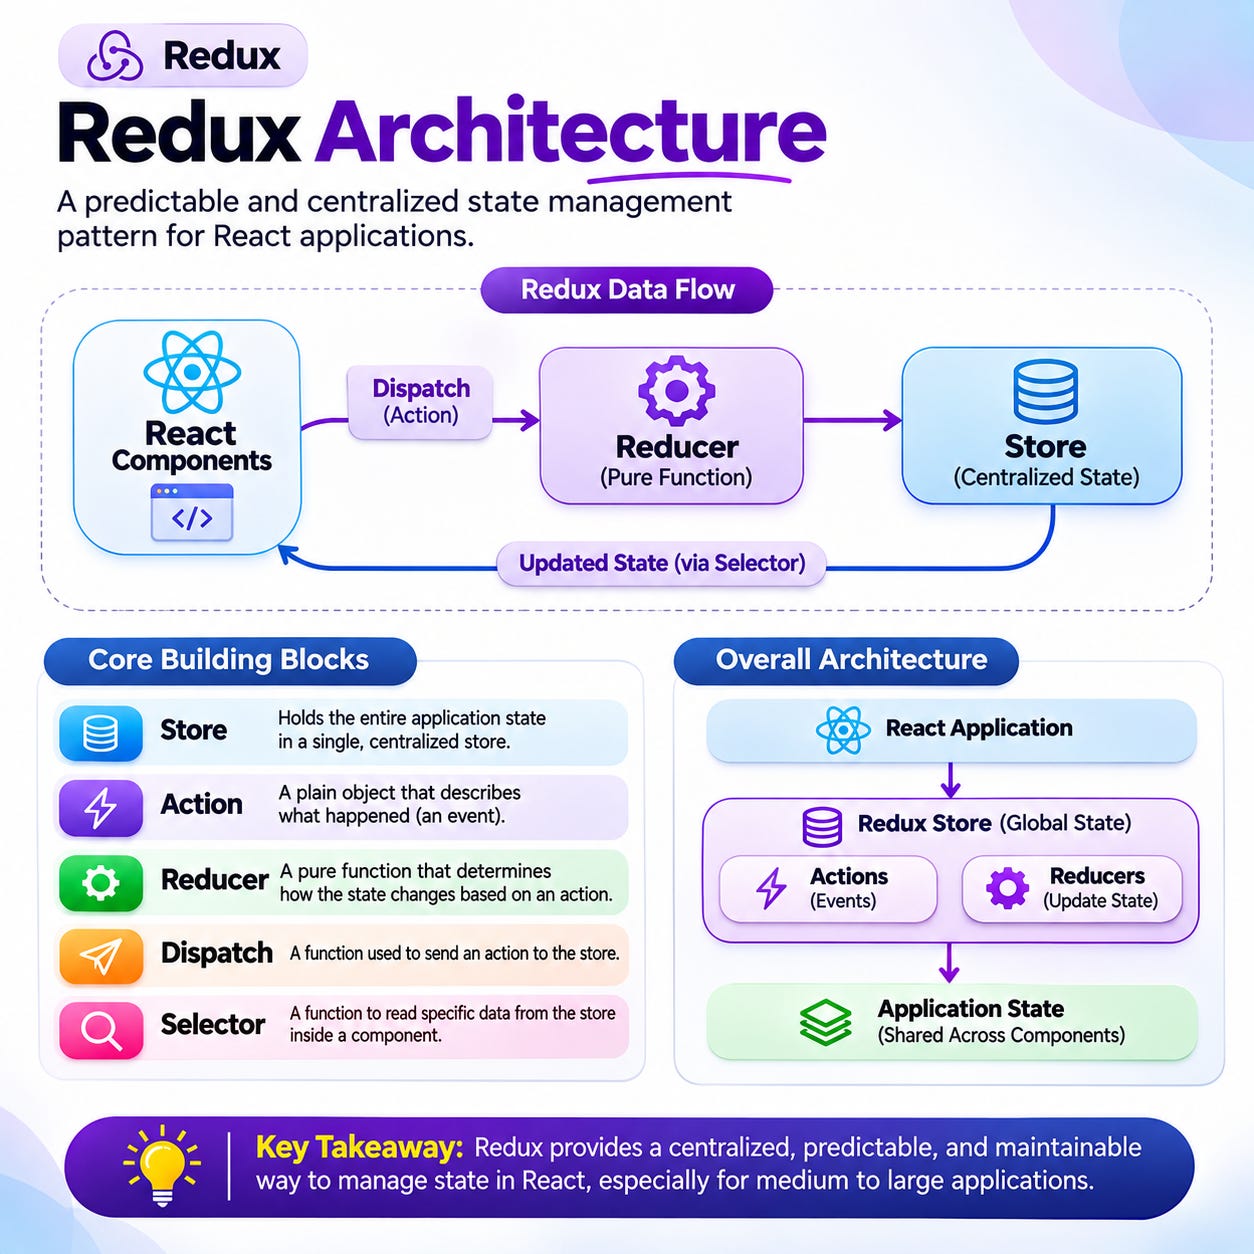
Redux follows a unidirectional data flow, meaning state updates follow a predictable direction.
Understanding these five concepts is essential:
1. Store
The store holds the centralized application state.
2. Action
An action describes what happened in the application.
3. Reducer
A reducer determines how the state should change based on an action.
4. Dispatch
Dispatch sends an action to the Redux store.
5. Selector
A selector allows components to read specific data from the store.
Redux Data Flow
The Redux data flow looks like this:
User performs an action.
Component dispatches an action.
Reducer processes the action.
Store updates the application state.
React components receive the updated state.
This predictable flow makes application state easier to manage and debug.
🛠️ What is Redux Toolkit?
Redux Toolkit (RTK) is the official recommended approach for writing Redux logic.
Traditional Redux often requires writing multiple action types, action creators, and reducers manually.
Redux Toolkit simplifies this process by providing useful APIs and reducing boilerplate code.
Important Redux Toolkit APIs:
API PurposeconfigureStore()Creates and configures the Redux storecreateSlice()Creates reducers and corresponding actionsuseSelector()Reads data from the Redux storeuseDispatch()Dispatches actions to update state
Instead of writing traditional Redux code, developers can use Redux Toolkit to implement state management more efficiently.
👉 Implement Redux Toolkit in React
Let’s understand Redux Toolkit with a simple Shopping Cart example.
Imagine an e-commerce application where users can add products to a cart and remove them.
Multiple components need access to the same cart data. We can use Redux Toolkit to manage this shared state.
Step 1: Install Dependencies
npm install @reduxjs/toolkit react-reduxStep 2: Create a Redux Slice
Create a file named cartSlice.js.
import { createSlice } from '@reduxjs/toolkit';

const cartSlice = createSlice({
  name: 'cart',

  initialState: {
    items: [],
  },

  reducers: {
    addToCart: (state, action) => {
      state.items.push(action.payload);
    },

    removeFromCart: (state, action) => {
      state.items = state.items.filter(
        item => item.id !== action.payload
      );
    },
  },
});

export const { addToCart, removeFromCart } =
  cartSlice.actions;

export default cartSlice.reducer;
What’s happening here?
createSlice()creates a Redux slice.initialStatedefines the initial cart state.addToCartadds a product to the cart.removeFromCartremoves a product from the cart.
Redux Toolkit uses Immer internally, so we can write mutation-like updates while maintaining immutable state updates.
Step 3: Configure the Redux Store
Create store.js.
import { configureStore } from '@reduxjs/toolkit';
import cartReducer from './cartSlice';

export const store = configureStore({
  reducer: {
    cart: cartReducer,
  },
});
The Redux store acts as the centralized location for application state.
Here, we register the cart reducer under the cart key.
Step 4: Provide the Store to React
Wrap your application with Redux’s Provider.
Update main.jsx.
import React from 'react';
import ReactDOM from 'react-dom/client';
import { Provider } from 'react-redux';

import App from './App';
import { store } from './store';

ReactDOM.createRoot(
  document.getElementById('root')
).render(
  <Provider store={store}>
    <App />
  </Provider>
);
Now all components inside the Provider can access the Redux store.
Step 5: Add Products to the Cart
Create Product.jsx.
import { useDispatch } from 'react-redux';
import { addToCart } from './cartSlice';

function Product() {
  const dispatch = useDispatch();

  const product = {
    id: 1,
    name: 'Laptop',
    price: 50000,
  };

  return (
    <div>
      <h3>{product.name}</h3>
      <p>Price: ₹{product.price}</p>

      <button
        onClick={() => dispatch(addToCart(product))}
      >
        Add to Cart
      </button>
    </div>
  );
}

export default Product;
Important concepts:
useDispatch()allows components to dispatch Redux actions.dispatch(addToCart(product))sends the product to the Redux store.The reducer processes the action and updates the cart state.
Step 6: Display Cart Items
Create Cart.jsx.
import { useSelector, useDispatch } from 'react-redux';
import { removeFromCart } from './cartSlice';

function Cart() {
  const dispatch = useDispatch();

  const items = useSelector(
    state => state.cart.items
  );

  return (
    <div>
      <h2>Shopping Cart ({items.length})</h2>

      {items.map(item => (
        <div key={item.id}>
          <span>
            {item.name} - ₹{item.price}
          </span>

          <button
            onClick={() =>
              dispatch(removeFromCart(item.id))
            }
          >
            Remove
          </button>
        </div>
      ))}
    </div>
  );
}

export default Cart;
Important concepts:
useSelector()reads the cart data from the Redux store.When the selected state changes, React Redux re-renders the component as needed.
removeFromCart()dispatches an action to remove the selected product.
Step 7: Use Components in App.jsx
import Product from './Product';
import Cart from './Cart';

function App() {
  return (
    <div>
      <h1>Redux Shopping Cart</h1>

      <Product />
      <Cart />
    </div>
  );
}

export default App;
That’s it! We have implemented a basic shopping cart using Redux Toolkit.
⚖️ Redux vs Context API vs useState
React provides different ways to manage state. Choosing the right approach depends on application requirements.
FeatureuseStateContext APIRedux ToolkitLocal stateYesNot its primary purposePossibleShared stateNo, not directlyYesYesCentralized storeNoNo built-in storeYesDevToolsLimitedLimitedYesBest suited forComponent stateShared stateComplex application state
Which one should you choose?
useState: For managing local component state.Context API: For sharing relatively simple state across components.
Redux Toolkit: For complex shared state and applications that benefit from centralized state management.
Remember, Redux is not necessary for every React application.
✅ When Should You Use Redux?
Redux can be useful when:
Multiple components need access to the same state.
Application state becomes complex.
Different components frequently update shared data.
You need predictable state transitions.
You want better debugging capabilities using Redux DevTools.
For smaller applications with limited shared state, useState or Context API may be sufficient.
⭐ Redux Best Practices
Here are some important practices to follow when working with Redux:
Prefer Redux Toolkit over traditional Redux for new applications.
Keep global state only where necessary.
Organize Redux logic using feature-based folders.
Use selectors to access store data.
Keep Redux state serializable.
Avoid unnecessary state duplication.
Keep component-specific state inside React when possible.
🎯 Conclusion
Redux provides a structured and predictable way to manage shared application state in React.
With Redux Toolkit, managing application state becomes simpler, cleaner, and easier to maintain.
However, Redux is not always the answer. The right state management approach depends on your application’s complexity and requirements.
Understand the problem first, then choose the right state management solution.
Happy Coding! 🚀